Installation (Compute Grid)
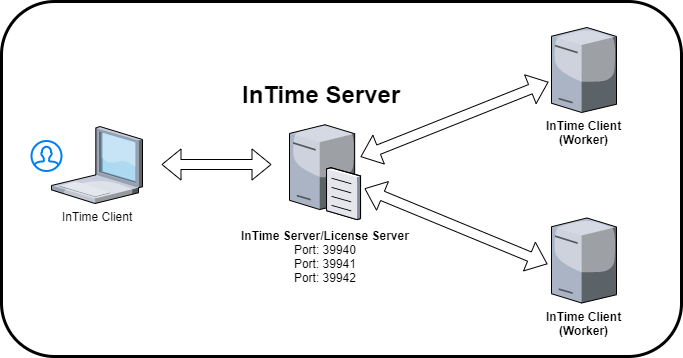
InTime can be deployed on multiple networked machines or in a server farm. Workload systems, such as LSF and SGE, are supported. Below is a typical deployment scenario for multiple InTime "workers" (see figure below).
Private Cloud Components
These are the components of a multi-seat configuration.
| Roles | Description |
|---|---|
| InTime Server/License Server | Manages job scheduling, collating results and license management. |
| InTime (Worker) | Workers receives job assignments from the Server and runs them. |
| InTime (Client) | Client submits jobs (FPGA projects) to the Server and collates the results. |
InTime/License Server
The InTime Server acts as a job scheduler/manager and license manager when InTime is running on multiple machines at the same time. A License Server is also packaged together and is a service to allow InTime to use floating licenses. These two services are installed automatically if the default installation options are selected.
Requirements
- Operating System: 64-bit architecture. Windows 10 / Ubuntu 20.04 LTS / Ubuntu 22.04 LTS / Red Hat Enterprise 8 and above, or compatible.
- Minimum 500GB free disk space.
- Static IP address (also supports 127.0.0.1) to communicate with InTime worker processes.
-
Network ports
- Ports 39940, 39941 to communicate with InTime worker processes.
- Port 39942 for the administrative console.
- Port 39946 for web-based configuration.
Note
Java is required but InTime will install its own Java 1.8.0 JDK.
Deploy License Server Separately
Note that it is possible to deploy the License Server separately from the InTime Server. This can be due to administrative reasons. For example, licenses are located on an isolated machine. Another reason to separate the License Server is because the InTime handles file transfer and acts as a file handling manager, therefore it might be better to deploy it on a bigger machine.
To understand how to deploy the license separately, please refer to How to install License Server and InTime Server separately?
Linux Installation
Note
Starting from InTime version 2023.2, the Linux version of InTime and its companion InTime Server are merged into a single software package for convenience and ease of installation. Depending on your InTime version, follow the "Bundled" or "Standalone" installation steps below.
Bundled InTime Server
-
Once the InTime software is installed, no further step is needed to install InTime Server.
-
The files and directory structure of the
serverfolder are the same as those in a standard InTime Server installation. To run InTime Server, create a directory with write access permissions and use the-wdargument to point to it.Warning
Overwriting the files or reinstalling the InTime installer will cause the InTime Server to throw exceptions as files are overwritten. Users need to restart the InTime Server service to resolve the exceptions. The working directory must have sufficient disk space required for the data.
Prerequisite: A folder with write access permissions to serve as InTine Server's working directory.
-
Next, start InTime Server with the
-wdargument pointing to the newly-created working directory.
In the example below, the user creates a new folder called intimeserver_wd to designate as InTime Server's working directory, and copies the InTime license, server.lic, into it.
$ pwd
/home/user
$ mkdir intimeserver_wd
$ cd intimeserver_wd
$ cp /tmp/server.lic .
$ ./start_server.sh -wd /home/user/intimeserver_wd/

----- SHELL SCRIPT VARIABLES -----
SERVERIP 1        = 192.168.2.100


$---------- BEGINNING OF LOG FILE ----------
UTC DATE/TIME: 2015-12-15 02:32:01.269


$---------- BEGINNING OF LOG FILE ----------
UTC DATE/TIME: 2015-12-15 02:32:01.269
Write permission (plunify.db) [  OK  ]
JDBC (plunify.db)             [  OK  ]
JDBC (intimeruns.h2.db)       [  OK  ]
Starting InTime Server        [  OK  ]
Starting License Server       [  OK  ]
Starting ACL Server           [  OK  ]
License server.lic            [  OK  ]
License has started?          [  OK  ]
License not expired?          [  OK  ]
License Mac 08:00:27:70:A5:E2 [  OK  ]
License features              [  OK  ]

Admin portal can be accessed at http://localhost:39946/admin

$
Standalone InTime Server
Skip this section if you have already completed the "Bundled InTime Server" installation.
-
Download the InTime Server installer from https://cloud.plunify.com/downloads.
-
Login as a privileged user and set user execute permissions for "intimeserver_v<version>_64bit_linux.sh". In this example, the user is "cadadmin", and the installation directory is "/home/cadadmin/intimeserver/".
$ pwd
/home/cadadmin/intimeserver/

$ chmod u+x intimeserver_v<version>_64bit_linux.sh
Warning
As a security precaution, the "root" user is not allowed to install and run the InTime Server. It is not recommended to install or run any 3rd-party applications as the 'root' user.
-
Run the installer file. Use default options for full installation. For those planning to migrate an existing InTime Server database and configurations from an earlier version, enter the same installation directory to overwrite an current installation.
$ ./intimeserver_v<version>_64bit_linux.sh

Verifying archive integrity...  100%   All good.
Uncompressing Plunify InTime Server version 2023.1.1 (Build 1234567)  100%

INFO      : Installing to /home/cadadmin/intimeserver

INFO      : Installing 64-bit JDK...

Select installation type: ('1' - Full installation InTime Server/License Server, '2' - License Server only, '3' - InTime Server only) [1]
INFO      : Installing InTime Server/License Server...
INFO      : Completed server type setup.

INFO      : Installing SQLite support (default)...
INFO      : Completed database setup.

Clean up and remove installation files? ('y' - Yes, 'n' - No) [n]
INFO      : Not removing installation files.

Select a JVM (Java Virtual Machine) option:
  How to select the JVM option?

  Use minimal JVM:
    a. More than 10 Concurrent Runs (parallel compilations).
    b. Project Archive size is 4 GB or more.
    c. InTime Server machine has 4 GB or more RAM.

  Use minimal JVM:
    a. More than 6 Concurrent Runs (parallel compilations).
    b. InTime Server machine has less than 4 GB RAM.

Specify JVM option: ('1' - minimal, '2' - optimal) [2]
INFO      : Using optimal JVM configuration by default.
INFO      : Completed JVM setup.

To migrate an existing InTime Server installation, enter the existing installation path: (<Enter> to skip migration)
INFO      : No migration required.
INFO      : Completed migration step.

Specify the license file e.g. server.lic: (<Enter> to skip if you wish to copy the license file manually later)
INFO      : Not automatically installing the license file.
INFO      : Please copy the license file e.g. server.lic to /home/cadadmin/intimeserver/ before running.
INFO      : Completed license file installation step.

InTime Server/License Server installation OK.

Next,
    Make sure that the license file (e.g. server.lic) is in /home/cadadmin/intimeserver/
    Run the following commands in a terminal console:
        cd /home/cadadmin/intimeserver
        ./start_server.sh

$
Specify JVM (Java Virtual Machine) options
There are two options: [1] Minimal setting for 1GB of heapspace - suitable for running just the License Server; [2] Optimal setting for 4GB of heapspace - typically used for running the InTime Server.
Install License Server and InTime Server on 2 different servers
To install License Server and InTime Server on 2 or more servers, refer to this webpage for more information.
-
Install license and start the InTime Server. Copy the license file, e.g. server.lic, into
/home/cadadmin/intimeserver/and launch the InTime Server. To launch the InTime Server, run the script./start_server.sh.
$ pwd
/home/cadadmin/intimeserver
$ ./start_server.sh

----- SHELL SCRIPT VARIABLES -----
PID [OLD]         = 29016
SERVERIP 1        = 192.168.2.100


$---------- BEGINNING OF LOG FILE ----------
UTC DATE/TIME: 2015-12-15 02:32:01.269


$---------- BEGINNING OF LOG FILE ----------
UTC DATE/TIME: 2015-12-15 02:32:01.269
Write permission (plunify.db) [  OK  ]
JDBC (plunify.db)             [  OK  ]
JDBC (intimeruns.h2.db)       [  OK  ]
Starting InTime Server        [  OK  ]
Starting License Server       [  OK  ]
Starting ACL Server           [  OK  ]
License server.lic            [  OK  ]
License has started?          [  OK  ]
License not expired?          [  OK  ]
License Mac 08:00:27:70:A5:E2 [  OK  ]
License features              [  OK  ]

Admin portal can be accessed at http://localhost:39946/admin

$
!!! tip
    To start/restart the Server at a later time, just run `./start_server.sh` again. To shut down the server run
    `./start_server.sh -stop`
Check InTime Server Status
$ ps -ef|grep java
intime    5700     1  2 07:16 pts/3    00:00:03 /home/caadmin/intimeserver/./jdk/bin/java -Xms512m -Xmx1024m -server -Dlogback.configurationFile=/home/caadmin/intimeserver/./conf/logback.xml -DINTIMESERVER_HOME=/home/caadmin/intimeserver/. -classpath /home/caadmin/intimeserver/./intimeserver.jar:/home/caadmin/intimeserver/./lib/* com.plunify.main.InTimeServer -directory /home/caadmin/intimeserver/./plunify_server -licensefile /home/caadmin/intimeserver/./server.lic -log_level info
!!! tip "Automatically Start Server (Optional)"
    To automatically start the InTime Server when a machine boots up, add the following line to `/etc/rc.local`.
    $ vi /etc/rc.local
    /bin/su -s /bin/bash -c '/home/cadadmin/intimeserver/start_server.sh' cadadmin
Windows Installation
-
Download the (windows) installer from https://cloud.plunify.com/downloads.
-
Run the installer by double-clicking it on the machine designated as the InTime server. Select "Full Installation" to install the default. InTime Server will be installed in the default directory
C:\intimeserver. The installer will attempt to overwrite earlier version of libraries and files, do make sure a backup to this directory before installing. -
Request a license from Plunify by providing the MAC address of the InTime Server machine. After receiving the license file, for example,
server.lic, place it inC:\intimeserver. -
Open a command prompt and navigate to
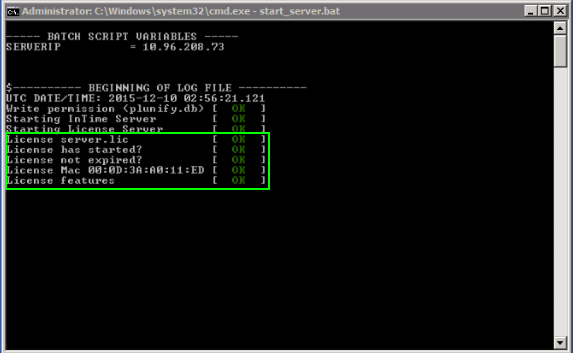
C:\intimeserver. To launch InTime Server, run thestart_server.batscript.Stop and restart
To shut down the server run
start_server.bat -stop. To start/restart the Server at a later time, just runstart_server.batagain in another shell.Please ensure that you see the license acceptance message as shown below
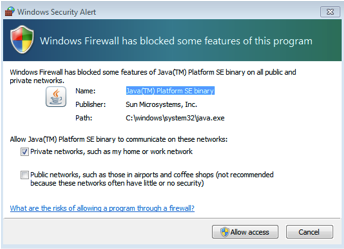
A Windows Security Alert may pop up indicating that a Java binary is running. Click "Allow access" as shown below
Unattended Installation
Assuming the InTime version is 2023.2.
Windows:
C:\Users\Test\Downloads> intime_v2023.2.0_64bit_win.exe /AllUsers /S /NCRD
Linux:
$ ACCEPT_LICENSE=1 DEFAULT_INSTALL=1 sh intime_v2023.2.0_64bit_linux.sh
Similarly, for InTime Server,
Windows:
C:\Users\Test\Downloads> intimeserver_v2023.2.0_64bit_win.exe /AllUsers /S /NCRD
Linux:
$ DEFAULT_INSTALL=1 sh intimeserver_v2023.2.0_64bit_linux.sh
| Argument | Description |
|---|---|
| DEFAULT_INSTALL | '1' - Full installation InTime Server/License Server, '2' - License Server only, '3' - InTime Server only |