Launching InTime Agents
Start Agent
The InTime Agent is responsible for notifying the InTime Server when an InTime worker is online or available. Upon starting the InTime Agent, it will send a notification to the Server that this machine is online. It also informs the InTime Server of its status, such as "Busy", "Pending" etc. The InTime Agent will actively poll the Server. If the agent is uncontactable for an extended period of time, InTime Server will treat this Agent as "inactive" and will not assign any job to it.
There are 3 ways to run the agents
1. Manually logging into remote servers and launch each agent with command line
2. Use SSH to launch agents
3. Launch agents using LSF/PBS/SGE/SLURM workload management/grid systems.
Using Command Line
The manual way to start an Agent is log onto each build machine and run the start_agent.sh script. For example:
$ ./intime_agent.sh -ip 192.168.10.1 -comport 39940 -mode background -platform minimal &
Below is an explanation of the arguments used in the command.
| Arguments | Description |
|---|---|
| ip | This is the InTime Server IP address |
| comport | This is the network port required to connect to the server. |
| mode | "background" means it is running as Tcl or a batch |
| platform | "minimal" means there is no GUI. |
The trailing & allows intime_agent.sh to run in daemon mode, so if you close the terminal, the process will still continue to run.
Next, use .toolchain to verify if all Agents successfully received and applied the FPGA tools' information from the Server.
user>.toolchain
+-----+--------------------+-------+--------+--------+-------+--------+-----------+---------+
| NO. | CLIENTID           | JOBID | USERID | STATUS | ALIVE | VENDOR | TOOL      | VERSION |
+-----+--------------------+-------+--------+--------+-------+--------+-----------+---------+
| 1   | user_192_168_2_211 |       | user   | FREE   | YES   | ALTERA | QUARTUSII | 13.1.2  |
| 2   | user_192_168_2_212 |       | user   | FREE   | YES   | ALTERA | QUARTUSII | 13.1.2  |
+-----+--------------------+-------+--------+--------+-------+--------+-----------+---------+
2 rows (0.01 sec), 2014-12-10 08:48:41
Agent GUI Mode
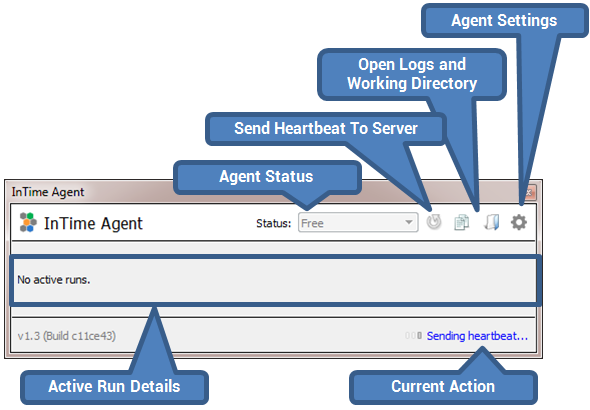
![]() InTime Agent can also be launched in GUI mode. Depending on the operating system, the InTime Agent GUI will also register itself in the system tray (Windows, Ubuntu). After starting the agent, a GUI will appear.
InTime Agent can also be launched in GUI mode. Depending on the operating system, the InTime Agent GUI will also register itself in the system tray (Windows, Ubuntu). After starting the agent, a GUI will appear.
Using SSH method
InTime version 2.7.0 supports a new feature that starts agents via SSH command. This feature is applicable only in a Linux environment.
Prerequisites
- The supported environment is Linux, currently InTime does not support Windows.
- The supported SSH protocol is SSH-2.0-OpenSSH.
- The user must have the write permission to the file
~/.ssh/authorized_keysof all remote servers. - The InTime tool path must be the same for all Linux machines.
SSH Types
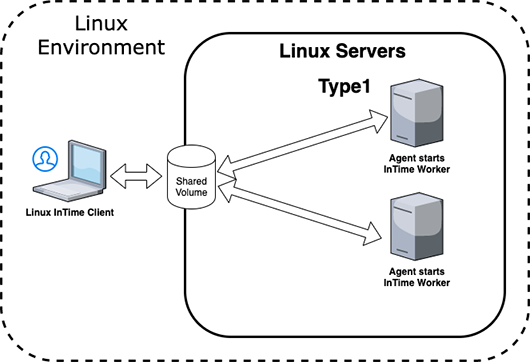
Currently this feature support 2 types of setups.
Type 1 : Users shared a common disk volume to all Linux servers. This is a very common setup.
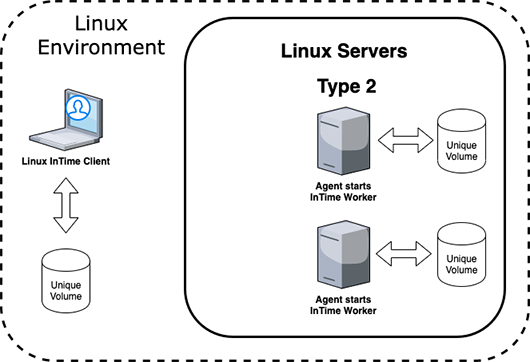
Type 2 : User does not have a shared disk volume with all servers. Each server has its disk volume and it is not shared. In this case, an additional step is needed to enable SSH access. Open the file <intime sessions path>/intime.key.pub (this is the public key), copy and paste the text into the ~/.ssh/authorized_keys file located in the remote servers that is required to run the agent.
GUI Setup
Open the settings dialog using File *Settings* and then select Run Targets. Check the "Enable" checkbox. Most of the parameters are configured automatically.
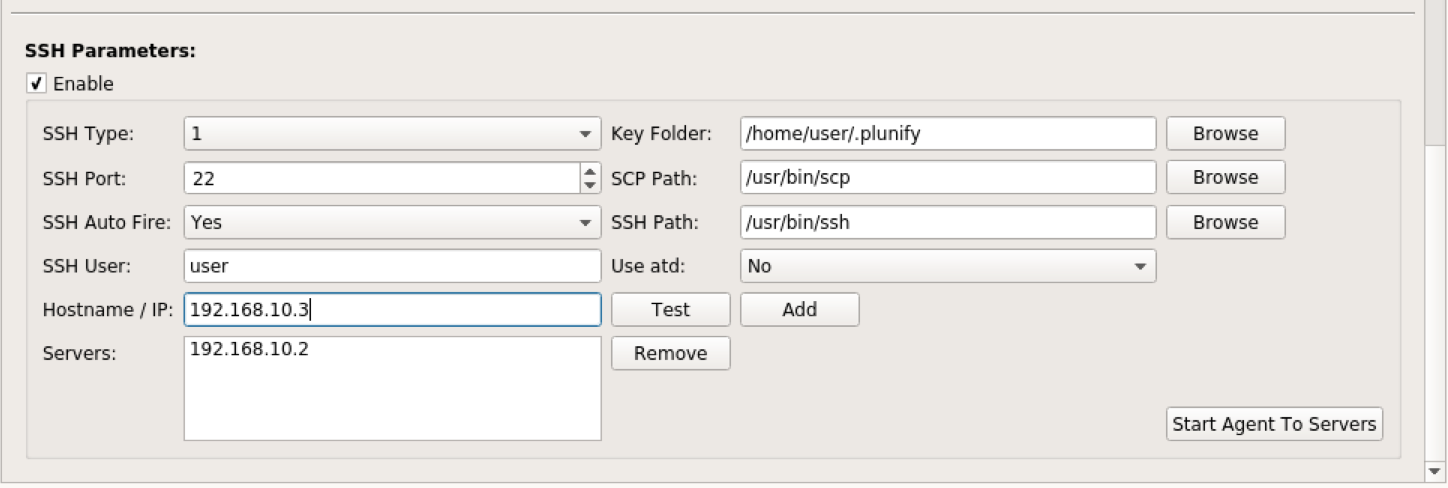 Ensure that the values for the 3 bold parameters are correct.
| Field Name | Description |
|---|---|
| SSH Type | The default is type 1 which is the common setup which servers shared a common volume. |
| SSH Port | The default port is 22. If the SSH port is not 22, change to the correct value. Currently InTime only support same port for all remote servers. |
| SSH Auto Fire | The default port is Yes. After users submit a job to InTime Server, InTime will attempt to start agents via SSH command. InTime will not start agents when it is set to No. |
| SSH User | Default to the user that starts InTime. |
| Hostname / IP | Input the remote servers that will be used for running agents. |
| Servers | The list of added hostnames, IP addresses. |
| Key Folder | Default to ~/.plunify. There will be 2 keys generated by InTime. Private key is intime.key and public key is intime.key.pub. The public key will be appended to ~/.ssh/authorized_keys to allow InTime to perform SSH operation. |
| SCP Path | Default to /usr/bin/scp. This is the location of the scp binary. |
| SSH Path | Default to /usr/bin/ssh. This is the location of the ssh binary. |
| Use atd | This is for advanced user. There are cases when InTime needs to leverage on atd daemon to start the agent due to some restriction in SSH command. |
- Enter a valid hostname or IP address in the textbox "Hostname / IP".
-
Click on the "Test" button. If the host allow SSH-2.0-OpenSSH connection, a "Test successful" message box will be shown. If the SSH port, protocol or the IP address entered is not correct, "Test failed!" message box will be shown.
-
Click the "Add" button to add the validated IP address to the Listbox. Repeat the process to add more IP addresses or hostnames.

-
Click on "Start Agent > Servers" button. InTime will attempt to start agent via SSH command with the list of servers for testing purposes.
- To test the agents, select "Launch and terminate agents after launch" button. This will start agents on the remote servers and terminate after 2 heartbeats.

Using LSF/PBS/SGE/SLURM
Please refer to the InTime Configuration for LSF/PBS/SGE/SLURM page.
Verify Agent Status
In the Server Admin Console, type .status to list active Agents.
user>.status
+-----+--------------------+-------+--------+--------+-------+--------+-----------------+
| NO. | CLIENTID           | JOBID | USERID | STATUS | ALIVE | B.LIST | LAST_HEARTBEAT  |
+-----+--------------------+-------+--------+--------+-------+--------+-----------------+
| 1   | user_192_168_2_211 | 2915  | user   | BUSY   | YES   | NO     | 08:43 (00m:48s) |
| 2   | user_192_168_2_211 | 2915  | user   | BUSY   | YES   | NO     | 08:43 (00m:36s) |
+-----+--------------------+-------+--------+--------+-------+--------+-----------------+
2 rows (0.01 sec), 2014-12-10 08:44:14
Next, use .toolchain to verify if all Agents successfully received and applied the FPGA tools' information from the Server.
user>.toolchain
+-----+--------------------+-------+--------+--------+-------+--------+-----------+---------+
| NO. | CLIENTID           | JOBID | USERID | STATUS | ALIVE | VENDOR | TOOL      | VERSION |
+-----+--------------------+-------+--------+--------+-------+--------+-----------+---------+
| 1   | user_192_168_2_211 |       | user   | FREE   | YES   | ALTERA | QUARTUSII | 13.1.2  |
| 2   | user_192_168_2_212 |       | user   | FREE   | YES   | ALTERA | QUARTUSII | 13.1.2  |
+-----+--------------------+-------+--------+--------+-------+--------+-----------+---------+
2 rows (0.01 sec), 2014-12-10 08:48:41
.intime.set.terminate Admin Console command. See the Private Cloud Console documentation for more information.
Finally, submit a test job using the InTime example design to verify that everything was set up correctly. Jump to the QuickStart page to learn how to submit an example design.
Why are there 2 Job IDs?
When submitting a job for Private Cloud, two Job IDs are created and used. A Local Job ID is generated by the InTime Client on the machine from which the builds are submitted. During submission the Server assigns a Remote Job ID which is unique within the Private Cloud. The Client shows both IDs in the project's job history, making it easy to track down a job using either ID.
Terminate Agents
Agents can be terminated using the .intime.set.terminate Admin Console command. See the Private Cloud Console documentation for more information.
Command Line Arguments
Please refer to InTime Agent Arguments page.